Battery switch on travel trailer function is crucial for managing your RV’s power. Understanding how these switches work—whether single-pole, double-pole, or double-pole double-throw—is key to preventing dead batteries and electrical issues. This guide will walk you through the different types, their functionalities, troubleshooting tips, and safe installation practices, ensuring you’re prepared for any power situation on the road.
We’ll cover everything from basic operation and safety precautions to more advanced topics like wiring diagrams and troubleshooting common problems. By the end, you’ll have the knowledge and confidence to handle your travel trailer’s battery system with ease, maximizing your enjoyment and minimizing potential headaches.
Types of Battery Switches in Travel Trailers
Choosing the right battery switch for your travel trailer is crucial for managing your power sources efficiently and safely. Different switches offer varying levels of control and complexity, each with its own set of advantages and disadvantages. Understanding these differences will help you select the best option for your needs.
Single-Pole Battery Switches
Single-pole switches are the simplest type. They offer ON/OFF control for a single battery bank. This means you can either connect the battery to the trailer’s electrical system or disconnect it completely. Installation is straightforward, usually involving just two wires. However, they lack the flexibility of more advanced switches.
They’re best suited for smaller trailers with a single battery and simpler electrical systems. A common application is to isolate the house battery from the trailer’s wiring during storage to prevent parasitic drain.
Double-Pole Battery Switches
Double-pole switches provide more control by allowing you to switch both positive and negative terminals simultaneously. This improves safety by ensuring both connections are made or broken at the same time, reducing the risk of shorts or accidental connections. Installation is slightly more complex than single-pole switches, requiring four wire connections. They are a good middle ground offering increased safety over single-pole switches while remaining relatively easy to install and maintain.
They are suitable for trailers with a single battery bank that need improved safety.
Double-Pole Double-Throw (DPDT) Battery Switches
DPDT switches offer the most control. They allow you to switch between two different battery banks (e.g., a house battery and a starting battery) or even connect both banks in parallel. This setup is ideal for larger trailers or those with multiple batteries. Installation is the most complex, requiring careful wiring to manage the multiple connections and avoid errors.
While offering significant flexibility, the increased complexity necessitates a higher level of electrical knowledge for installation and troubleshooting.
Comparison of Battery Switch Types, Battery switch on travel trailer function
| Feature | Single-Pole | Double-Pole | Double-Pole Double-Throw (DPDT) |
|---|---|---|---|
| Number of Batteries Controlled | 1 | 1 | 2 or more (selectable) |
| Safety | Lower | Higher | High |
| Complexity | Low | Medium | High |
| Cost | Low | Medium | High |
| Application Suitability | Small trailers, simple systems | Most trailers, improved safety needed | Large trailers, multiple batteries |
Function and Purpose of Battery Switches
A battery switch in your travel trailer is like a master control for your power system. It’s the key to managing power flow from different sources and preventing your batteries from being completely drained, protecting your valuable investment. Understanding its function is crucial for safe and efficient use of your RV.Battery switches primarily isolate your house batteries from other electrical systems.
This prevents accidental discharge, safeguarding your batteries from being completely drained if something is left running, like a light or a fan, while you’re away from your trailer. This isolation also prevents a dead battery from draining your other power sources. Think of it as a gatekeeper, allowing you to selectively connect or disconnect your batteries.
Protection Against Over-Discharge and Accidental Draining
The most important role of a battery switch is preventing your house batteries from being completely discharged. This is crucial because deeply discharging a battery significantly shortens its lifespan. By turning the switch off when shore power or generator power is available, you prevent any parasitic drains (small continuous power draws from devices even when turned off) from depleting your batteries.
This protects against scenarios like leaving a light on unintentionally or having a faulty appliance continuously drawing power. The switch effectively creates a barrier, preventing unintended power loss.
Managing Power from Different Sources
A battery switch acts as a central hub for managing power flow from various sources. When you’re connected to shore power (at a campsite), the switch allows you to charge your batteries while simultaneously running appliances from shore power. Similarly, when using a generator, the switch allows charging and appliance operation. Solar panels also often feed power through the switch, contributing to battery charging and reducing reliance on other sources.
The switch enables you to seamlessly switch between these power sources, ensuring a continuous power supply to your trailer.
Operation of a Typical Battery Switch
Most battery switches are simple to operate. A common type is a multi-position switch, often with positions labeled “Off,” “Battery,” “Both,” and “Shore.”
- Off: This position completely disconnects the house batteries from the rest of the electrical system, preventing any power draw.
- Battery: This position connects only the house batteries to the trailer’s electrical system. Power is drawn solely from the batteries.
- Both: This position connects both the house batteries and shore/generator power to the system. Appliances can run on either source, and the batteries are simultaneously charged.
- Shore (or Generator): This position prioritizes shore power or generator power to run appliances. The batteries may still charge depending on the system’s design.
By understanding and correctly using your battery switch, you significantly extend the life of your batteries, prevent unexpected power outages, and ensure efficient power management in your travel trailer.
Troubleshooting Common Battery Switch Issues
Your travel trailer’s battery switch is a critical component, ensuring you can easily switch between your house batteries and your tow vehicle’s charging system. Problems with this switch can leave you stranded with dead batteries, so understanding how to troubleshoot them is essential. This section will guide you through identifying and resolving common issues.
Common Battery Switch Problems
Several issues can cause your battery switch to malfunction. These include corrosion on the terminals, loose connections leading to poor contact, and a faulty switch itself. Corrosion is particularly common in damp environments, and loose connections can vibrate loose over time, especially during travel. A faulty switch might simply wear out over time or be damaged due to accidental impacts.
Diagnosing a Non-Functional Battery Switch
Before you start replacing parts, systematically check each potential problem area. First, visually inspect the switch and its connections for any obvious signs of damage or corrosion. Look closely at the terminals for any green or white powdery substance—this is corrosion. Then, check for loose connections. Gently wiggle each wire to see if it moves excessively.
If corrosion is present, or the connections are loose, this is likely the cause of the problem. If the connections are tight and there is no corrosion, you might need to test the switch itself using a multimeter to confirm it is functioning correctly. If the multimeter indicates no continuity, the switch needs replacement.
Cleaning and Maintaining Battery Switch Connections
Preventing corrosion is key to a long-lasting battery switch. Regular cleaning and maintenance are essential. Begin by disconnecting the battery’s negative terminal. Then, use a wire brush or a battery terminal cleaner to remove any corrosion from the switch terminals and battery posts. Apply a corrosion inhibitor, such as dielectric grease, to the cleaned terminals to prevent future corrosion.
Ensure all connections are tight after cleaning and reconnecting the battery. Regularly inspecting your battery switch—at least once a year or before any extended trips—will help catch small problems before they become major headaches.
Troubleshooting Flowchart
Imagine a flowchart with these steps:
1. Start
Is the battery switch functioning correctly?
2. No
Visually inspect the switch and connections for corrosion or loose connections.
3. Corrosion or Loose Connections
Clean and tighten connections. Apply dielectric grease. Retest the switch.
So, you’re planning a trip? Awesome! First things first: get travel insurance. Check out Aon travel insurance for options; they’re pretty comprehensive. Then, if you’re hitting the road in a travel trailer, understanding the battery switch on travel trailer function is key to avoiding a dead battery and a ruined vacation. Seriously, knowing your trailer’s power system can save you a lot of headaches!
4. Still not functioning
Test the switch with a multimeter to check continuity.
5. Multimeter shows no continuity
Replace the battery switch.
6. Multimeter shows continuity
Check the battery and charging system for other problems.
7. Yes
End.This flowchart provides a clear, step-by-step guide for troubleshooting. By following this process, you can effectively diagnose and resolve most battery switch issues, ensuring a reliable power supply for your travel trailer adventures.
Wiring Diagrams and Installation Procedures
Installing a battery switch in your travel trailer is a straightforward process that significantly improves your RV’s electrical system management. Understanding the wiring diagram and following a proper installation procedure ensures safe and efficient operation. Improper installation can lead to electrical issues, so careful attention to detail is crucial.
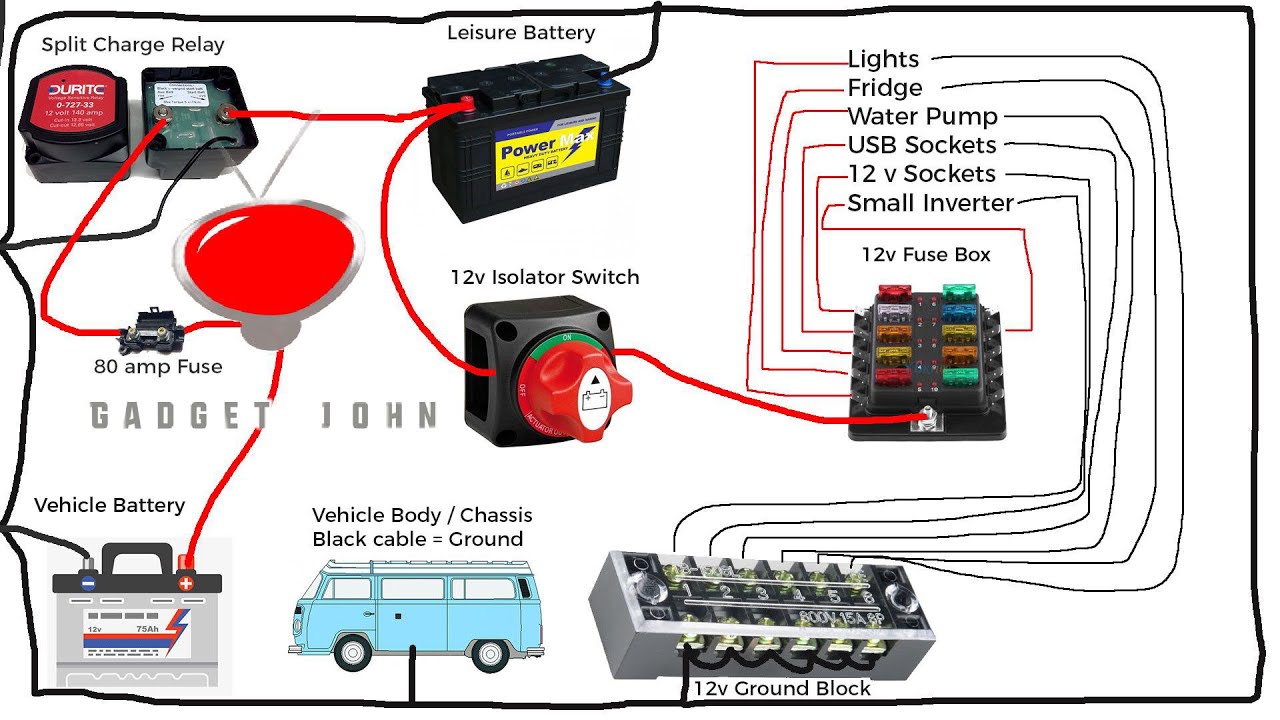
A basic wiring diagram for a battery switch shows the switch placed between the battery and the trailer’s main electrical panel. The positive (+) cable from the battery connects to one terminal on the switch. The other terminal of the switch connects to the positive input of the main electrical panel. The negative (-) cable from the battery is connected directly to the chassis of the trailer (ground) and usually doesn’t go through the switch.
This setup allows you to isolate the battery from the trailer’s electrical system when not in use, preventing parasitic drain and improving safety.
So, you’re planning a trip? Awesome! First things first: get travel insurance. Check out Aon travel insurance for options; they’ve got you covered. Then, if you’re hitting the road in an RV, knowing how the battery switch on travel trailer function works is key to avoiding a dead battery and a ruined vacation.
Seriously, understanding your trailer’s power system is a game-changer for a smooth trip!
Basic Wiring Diagram
Imagine a simple diagram. A battery symbol (+) and (-) is shown. A line connects the (+) terminal to a rectangle representing the battery switch. From the other side of the switch rectangle, another line extends to a rectangle labeled “Trailer Electrical Panel (+).” A separate line connects the battery’s (-) terminal to a ground symbol, often represented by a triangle with a short horizontal line at its base.
This illustrates the direct connection of the negative terminal to the trailer’s chassis. Arrows on the lines indicate the direction of current flow.
Battery Switch Installation Procedure
Before beginning any electrical work, always disconnect the negative (-) battery terminal to prevent accidental shorts and shocks. This is a critical safety precaution. The following steps Artikel the installation process.
- Locate the Installation Point: Choose a location that’s easily accessible, well-ventilated, and protected from the elements. Consider proximity to the battery and electrical panel for shorter wiring runs.
- Secure the Switch: Use appropriate mounting hardware to securely fasten the battery switch to the chosen location. Ensure a firm and stable mount to prevent vibration-related issues.
- Connect the Positive Cable: Connect one end of a suitably sized, heavy-gauge positive (+) cable to the positive terminal of the battery. The other end connects to the input terminal of the battery switch. Use appropriate connectors and ensure tight connections.
- Connect to the Electrical Panel: Run another suitably sized, heavy-gauge positive (+) cable from the output terminal of the battery switch to the positive input of the travel trailer’s main electrical panel. Again, use appropriate connectors and ensure tight connections.
- Connect the Negative Cable: Connect the negative (-) cable directly from the battery’s negative terminal to a suitable ground point on the trailer’s chassis. This connection should be clean, secure, and corrosion-resistant.
- Test the Installation: Reconnect the negative (-) battery terminal. Turn the battery switch on and check the operation of the trailer’s electrical system. Ensure all lights and appliances function correctly.
Necessary Tools and Materials
Having the right tools and materials on hand makes the installation process smoother and more efficient. Gathering these items beforehand saves time and prevents interruptions.
- Battery switch (appropriate size and type for your system)
- Heavy-gauge positive (+) and negative (-) cables (sufficient length)
- Wire connectors (crimp-on or solder-type)
- Wire strippers/cutters
- Screwdrivers (appropriate sizes for mounting hardware)
- Wrench (for battery terminals)
- Electrical tape (for insulation)
- Mounting hardware (screws, bolts, etc.)
- Multimeter (for testing)
Replacing a Faulty Battery Switch
Replacing a faulty battery switch is similar to the initial installation but involves disconnecting the existing switch. Safety remains paramount throughout the process.
- Disconnect the Battery: Disconnect the negative (-) battery terminal. This is crucial for safety before working with any electrical components.
- Disconnect the Wiring: Carefully disconnect the positive (+) cables from both the input and output terminals of the faulty switch. Note the connection points to ensure correct reconnection of the new switch.
- Remove the Faulty Switch: Remove the mounting hardware and carefully remove the faulty battery switch from its mounting location.
- Install the New Switch: Mount the new battery switch in the same location using the appropriate mounting hardware. Ensure a secure and stable installation.
- Reconnect the Wiring: Reconnect the positive (+) cables to the new switch, matching the connections from the old switch. Double-check that all connections are secure and correctly made.
- Reconnect the Battery: Reconnect the negative (-) battery terminal.
- Test the New Switch: Turn the new battery switch on and check the operation of the trailer’s electrical system. Verify that all lights and appliances function correctly.
Safety Precautions and Best Practices
Working with your travel trailer’s electrical system, especially the battery, requires caution. Improper handling can lead to serious injury, from electric shock to battery acid burns. Understanding and following safety procedures is paramount to protecting yourself and your RV.Disconnecting the battery before any electrical work is non-negotiable. This prevents accidental shorts, sparks, and potential damage to sensitive electronic components.
Even seemingly minor tasks should be preceded by this crucial step. Think of it as the first, and most important, step in any electrical repair or maintenance.
Battery Disconnection Procedure
Before working on any part of your travel trailer’s electrical system, always disconnect the negative (-) battery terminal first. Use a wrench appropriate for the terminal size and ensure a secure grip to avoid slipping. Then, disconnect the positive (+) terminal. This order minimizes the risk of accidental short circuits. When reconnecting, reverse the process, connecting the positive terminal last.
Maintaining the Battery Switch and Connections
Regular inspection and maintenance of your battery switch and its connections are essential for optimal performance and longevity. Inspect the switch for any signs of corrosion, loose connections, or damage. Clean any corrosion with a wire brush and baking soda solution, then apply a corrosion inhibitor. Tighten all connections to ensure a solid electrical path. A loose connection can lead to overheating, reduced performance, and potential fire hazards.
Consider applying dielectric grease to terminals to further prevent corrosion. This simple maintenance will extend the life of your battery switch and improve the overall reliability of your electrical system.
Safety Tips for Working with Batteries and Electrical Systems in RVs
Following these safety tips will significantly reduce the risk of accidents and injuries:
- Always wear safety glasses to protect your eyes from sparks and splashes of battery acid.
- Wear gloves to protect your hands from battery acid and corrosion.
- Work in a well-ventilated area to avoid inhaling harmful fumes from the battery.
- Never allow metal tools to come into contact with both battery terminals simultaneously; this could create a short circuit.
- Keep a fire extinguisher nearby in case of an electrical fire.
- If you’re unsure about any aspect of the work, consult a qualified RV technician.
- Never work on the electrical system while it is raining or in wet conditions.
- Before working with any electrical components, ensure the main power switch is turned off at the breaker box.
- Use insulated tools to prevent electrical shocks.
- Properly dispose of old batteries according to local regulations.
Mastering your travel trailer’s battery switch is about more than just turning power on and off; it’s about understanding your RV’s electrical system and ensuring its reliable operation. By following the safety guidelines and troubleshooting steps Artikeld here, you’ll be well-equipped to maintain your battery switch, prevent common issues, and keep your power running smoothly, wherever your adventures take you.
Remember, a little preventative maintenance goes a long way!
Questions and Answers: Battery Switch On Travel Trailer Function
What happens if my battery switch is faulty?
A faulty switch can lead to power loss, inconsistent power supply, or even damage to your batteries or other electrical components. It might not turn on, might be stuck in the “on” position, or might not properly isolate the batteries.
How often should I check my battery switch?
Regularly inspect your battery switch for corrosion, loose connections, and damage. At least once a year, and more often if you use your trailer frequently or in harsh environments.
Can I install a battery switch myself?
While possible, installing a battery switch requires some electrical knowledge and working with potentially dangerous voltages. If unsure, consult a professional RV technician.
How do I clean corrosion from my battery switch?
Use a wire brush to carefully remove corrosion from the terminals and switch contacts. Apply a corrosion inhibitor afterwards to prevent future buildup.
